Mandala Moon Yoga, LLC
Find Mandala Moon on social media!
  • Home
  • Yoga Teacher Training
  • YTT Application
  • YTT FAQ
  • YTT Testimonials
  • Classes & Events
  • Locations & Pricing
  • Private/Corporate Classes
  • Class Cancellations
  • Our Teachers
    • Dena
    • Deb
    • Kristin
    • Eleanor
    • Patti
    • Andrea
    • Tom
    • Katie
    • Kelly
    • Julia
    • Jhana
    • Mallory
    • Veronica
  • Contact
  • Kudos
  • Affiliations/Links
  • Photo Gallery
  • Newsletter Signup
  • Blog
  • MARI Readings
  • Yoga Book Club
  • iRest Series Evaluation
  • Customized Yoga Plan Survey
  • Yoga Breaks (Video)
  • Land Acknowledgement
  • COVID

Upward-Facing Dog/Urdvha Mukha Svanasana

6/3/2025

0 Comments

 
Picture
Upward-Facing Dog Pose, often called just "Up Dog," is a powerful and uplifting posture often woven into vinyasa flows and sun salutations. 

This pose offers strength, openness, and energy when practiced with awareness and proper alignment. Whether you’re just beginning your yoga journey or deepening your flow, remember to honor your body in its current state.

Practice with curiosity, listen to your body, and don’t hesitate to modify. Over time, your Up Dog will become less about forcing a shape and more about enjoying the spaciousness it can bring.
​

Benefits of Upward-Facing Dog
  • Strengthens the upper body: Builds strength in the arms, shoulders, wrists, and upper back.
  • Opens the chest and lungs: Promotes better posture and counteracts slouching or forward hunching.
  • Stimulates abdominal organs: Offers a gentle stretch to the belly, supporting digestion.
  • Improves spinal flexibility: Increases extension through the thoracic and lumbar spine.
  • Boosts energy: This heart-opening posture can feel energizing, especially in the morning.
Avoid or modify this pose if you have:
  • Recent or chronic back injuries
  • Carpal tunnel syndrome or wrist issues
  • Shoulder injuries
  • Pregnancy (especially in the 2nd and 3rd trimesters)
  • Neck sensitivity (avoid throwing the head back)
Check with your health care provider before beginning any physical practice. If you have high blood pressure, or back, neck or abdominal pain, try Sphinx Pose first. 

As always, if a posture causes pain, come out of it immediately. Ask a qualified yoga teacher for assistance.


Preparatory Poses & Warm-Ups
To safely enter Upward-Facing Dog, it’s helpful to first prepare the spine, shoulders, and wrists. Try these warm-ups:
  • Cat-Cow (Marjaryasana-Bitilasana) – warms up spinal mobility
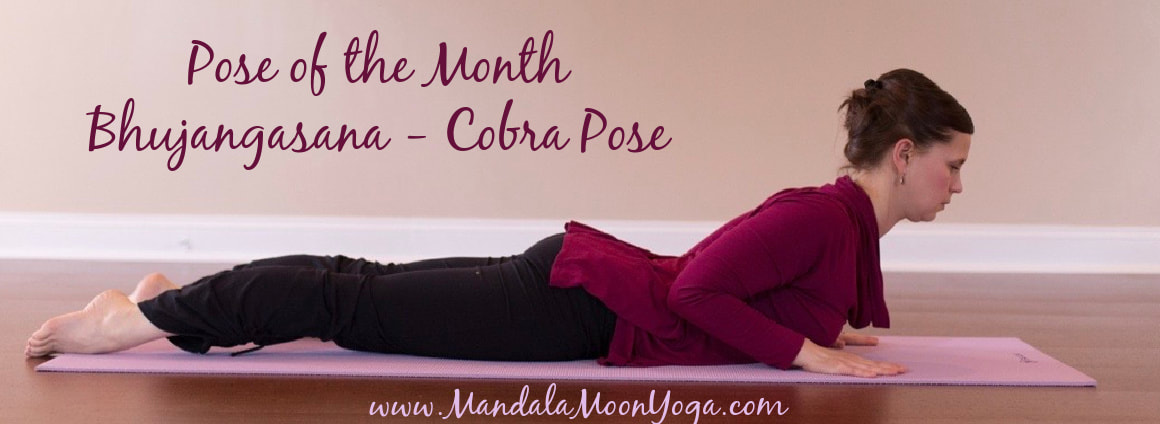
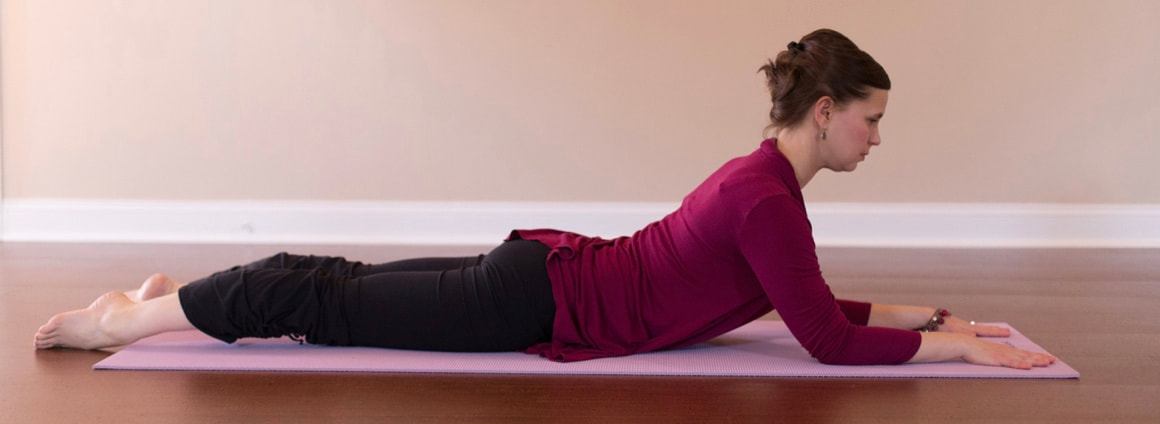
  • Cobra Pose (Bhujangasana) – builds foundational backbend strength
  • Sphinx Pose – strengthens the lower back without pressure on the wrists
  • Forearm or regular Plank Pose – activates core and shoulder engagement
  • Bridge Pose (Setu Bandhasana) – encourages spinal extension and heart opening
How to Practice
  1. Start lying face down on your mat, legs extended back with the tops of your feet pressing into the floor, hip-width apart.
  2. Place your hands under your shoulders, fingers spread wide. Hug your elbows in close to your ribs.
  3. Press firmly into your palms and tops of your feet as you inhale and lift your chest forward and up. Straighten your arms without locking the elbows.
  4. Lift your thighs and knees off the mat by engaging your quadriceps. Only the hands and tops of the feet should be touching the ground.
  5. Open your chest by drawing the shoulder blades down and together. Keep the neck long; gaze slightly forward or up (without crunching the neck).
  6. Hold for a few breaths, then gently lower back down or transition into Downward-Facing Dog.
Adaptations & Variations
  • Cobra Pose instead of Up Dog: Ideal for beginners, those with low back or wrist concerns, or anyone looking for a gentler alternative.
  • Keep thighs on the ground: If lifting the legs causes discomfort, keep them grounded and focus on opening the chest without overextending the spine.
Props for Support
  • Yoga blocks: Placed under the hands to reduce pressure on wrists and shoulders.
  • Blanket under thighs or pelvis: Provides cushioning and can decrease lumbar compression.
0 Comments

Skandasana - Side Lunge Pose

5/11/2025

0 Comments

 
Picture
Skandasana is a low side lunge that requires mobility, strength, and control. Named after Skanda, a warrior deity in Hindu mythology, the pose invites a grounded yet agile energy. It’s commonly practiced as part of hip-opening flows, including the traditional Kripalu Moon Salutations, or as a transition between standing poses.

Sanskrit
Skanda = a warrior deity associated with courage, wisdom, and valor; son of Shiva and Parvati

Asana = Pose
(Skan-DAH-suh-nuh)

Benefits
  • Stretches the inner thighs, groin, and hamstrings
  • Engages and builds strength in the quads, glutes, and calves.
  • Enhances joint health and range of motion in the hips and knees.
  • Requires and cultivates core stability and mental concentration.
  • Opens energetic pathways in the lower body, encouraging grounding and vitality.
How to Practice
  1. Start in a Wide-Legged Forward Fold
    Begin standing with your feet about 3 to 4 feet apart. Fold forward, letting your hands touch the mat.
  2. Bend into One Knee
    Shift your weight into your right foot, bending the right knee deeply as you sink your hips toward the floor. Keep the left leg extended with the toes pointing upward, heel grounded.
  3. Adjust Your Upper Body
    Keep your spine long and chest lifted. Bring your hands to prayer at your heart or place them on the mat for support.
  4. Stay Active
    Flex the extended foot to engage the leg. Keep the bent knee tracking over the toes. Engage your core and press into the grounded foot.
  5. Breathe and Hold
    Hold the pose for 5–8 breaths, feeling the stretch and strength in the legs and hips.
  6. Transition to the Other Side
    Use your hands for balance if needed, shift your weight through center, and repeat on the other side.
Variations
Skandasana can be intense, especially if you're working with tight hips, joint issues, or limited mobility. Here are some helpful adaptations:
  • Place yoga blocks under your hands for balance and support.
  • If your squatting heel doesn’t comfortably reach the ground, lift or prop it to reduce strain on the ankle.
  • If you want some balance support, lower the ball of the extended leg’s foot.
  • Reduce the width of your stance to make the pose more accessible.
  • Sit on a bolster or folded blanket to decrease the depth of the lunge.
  • Come into a “higher” version of the pose. From a wide stance, bend right knee as much as is comfortable and shift weight to the right.
  • Start in Malasana
Precautions:
Check with your healthcare provider before beginning any physical practice. As always, if a posture causes pain, come out of it immediately. Ask a qualified yoga teacher for assistance.

0 Comments

Vikasita Kamalasana

4/7/2025

0 Comments

 
Picture
We'll be exploring a non-traditional pose this month. It’s got a springy vibe, it’s doable for most, and it’s fun to say!

Vikasitakamalasana (or Vikasita Kamalasana) isn't a traditional or widely recognized pose, so you may find that different studios or teachers are using this pose name to describe different poses. For our purposes, we are referring to the version pictured in the graphic, above.

Vikasita = flowering or blossoming
Kamala = one of the names for lotus flower
Asana = pose
Vikasita Kamalasana = Flowering or Blossoming Lotus Pose
Pronounce: Vee-KAH-see-tah Kah-MAH-lah-sah-nah

Understanding the Concept of "Flowering Lotus"
  • Opening and Expansion: The term "flowering" suggests a deeper opening of the hips and a lifting of the chest, similar to a lotus flower blooming.
  • Progression from Lotus: It often implies a step beyond the basic seated Lotus Pose, potentially involving a balancing element. We’ll be exploring a variation progressing from bound angle pose.
  • Metaphorical Meaning: The lotus flower in yoga symbolizes spiritual awakening, purity, and resilience. The "flowering" aspect can represent the unfolding of one's potential or a spiritual awakening.
Instructions:
  1. Start in Baddha Konasana (Bound Angle Pose): Sit with the soles of your feet together and knees falling open to the sides. Hold onto your big toes with your “peace fingers,” clasp hands together under your feet, or hold your ankles.
  2. Lift the Feet: Lift both feet off the floor, keeping your heels pressed together and lifting the inner heels upward until you are balancing on your sit bones.
  3. Thread the Arms: Thread both arms under your knees.
  4. Find Balance: Join your thumb and forefinger together (Jnana Mudra). Open your chest, lift your heart, and focus your gaze on a drishti. Continue to balance on your sit bones.
  5. Hold and Breathe: Maintain a steady breath for a comfortable duration.
Variation:
​Utthita Vikasitakamalasana (Extended Blossoming Lotus Pose Variation):
From the balanced position, you might extend your legs forward while still holding onto your big toes with your "peace-sign" fingers (index and middle finger). Lift your chest and gaze up.


Notes:
  • Warm-up: Always warm up your hips, knees, and ankles thoroughly before attempting Lotus or its variations. Hip openers like Baddha Konasana, Malasana (Garland Pose), and hip rotations are beneficial.
  • Listen to Your Body: Never force your legs into position. If you feel any pain, back off immediately.
  • Spinal Alignment: Maintain a tall and straight spine throughout the pose.
  • Breath: Breathe deeply and evenly throughout the practice.
  • Mindfulness: Focus on the sensations in your body and the flow of your breath.
  • Guidance: It's highly recommended to learn these poses from an experienced yoga instructor who can provide personalized guidance and ensure proper alignment.
0 Comments

Unleash your Inner Roar

3/3/2025

0 Comments

 
Picture
I used to joke that I wanted to design a tee shirt that says “There’s a breath for that.” In the realm of yoga and pranayama, there are practices for just about everything. Some practices gently soothe and calm us, some are meant to balance out our energy and wake up the brain, and some ignite a powerful, transformative energy. Lion's Breath, or Simhasana, falls firmly into the latter category.

This practice, often accompanied by a dramatic facial expression and a resounding "HA," is more than just a theatrical display; it's a potent tool for releasing tension, calming the mind, and invigorating the spirit. I urge you to Google “Lion’s Breath” for some entertaining photos. Don’t let the face dissuade you from the practice, though. There's much to be gained. See the end of this post for a shameless photo of me in this pose once upon a time in Utah. I had to modify a bit because of the dirty sidewalk, but you'll get the gist!

What is Lion's Breath?
Simhasana, derived from the Sanskrit words "simha" (lion) and "asana" (pose), mimics the posture and breath of a roaring lion. It involves:
  • Posture: Typically, it's performed in vajrasana (thunderbolt pose, sitting on your heels) with the hands placed on the knees or the floor, fingers spread wide like claws. Alternatively, it can be done seated in a comfortable cross-legged position or during standing poses.
  • Facial Expression: The mouth is opened wide, the tongue extended downwards, and the eyes are open wide and gazing up toward the space between the eyebrows.
  • Breath: A powerful, forceful exhale through the mouth, accompanied by an airy "HA" sound, resembling a lion's roar.

The Benefits of Lion's Breath:
This dynamic practice offers a multitude of benefits, both physical and mental:
  • Stress and Tension Release: The forceful exhale helps release pent-up emotions and physical tension, particularly in the face, jaw, and neck.
  • Vocal Cord Stimulation: It can be beneficial for singers, speakers, and anyone who wants to improve their vocal clarity and strength.
  • Facial Muscle Exercise: The exaggerated facial expression tones and strengthens the muscles of the face and neck, potentially reducing wrinkles.
  • Mental Clarity: The powerful breath and release can help clear mental clutter and promote a sense of calm and focus.
  • Digestive Fire (Agni) Stimulation: In yogic philosophy, the forceful exhale is believed to stimulate the digestive fire, aiding in digestion.
  • Emotional Release: The act of "roaring" can be a cathartic experience, allowing for the release of suppressed emotions.
  • Chakra Activation: From a yogic perspective, Simhasana is said to activate the throat chakra (Vishuddha), associated with communication and self-expression. 
How to Practice Lion's Breath:
  1. Find a Comfortable Position: Begin in Vajrasana (thunderbolt pose), or in a comfortable cross-legged position.
  2. Hand Placement: Place your hands on your knees or the floor, fingers spread wide.
  3. Prepare to Roar: Inhale deeply through your nose.
  4. Exhale Forcefully: Open your mouth wide, extend your tongue downward, and exhale through the mouth by contracting your abdominal muscles and pelvic floor. Make an airy "haaaaa" sound. Simultaneously, widen your eyes and gaze up and in, toward the center of your brow. You may also lift off your heels as you exhale.
  5. Repeat: Repeat the breath 3-5 times, or as desired.
  6. Relax: After completing the practice, sit quietly and observe the effects.
Tips and Considerations:
  • If you have any jaw pain or TMJ issues, be gentle with the facial expression.
  • ​Listen to your body and avoid pushing yourself beyond your limits.
  • This exercise, while beneficial, should not be used as a replacement for medical advice.
Picture
0 Comments

Child's Pose/Garbhasana

10/10/2024

0 Comments

 
Picture
Garbhasana, or Child's Pose, is a common pose. It's rare to take a class that doesn't incorporate this surrendering forward bend. In more heated classes, it's often used as a resting position, but it's not necessarily "easy," especially for those with knee or hip sensitivity.

Sanskrit:

Garbha = a fetus; asana = pose
(gar-BAH-sah-nah)

AKA: Balasana (Bal-AH-sah-nah) Bala = Child

Benefits:
  • Stretches the back, thighs, hips, ankles.
  • Stimulates the digestive system. Stimulates peristalsis and relieves constipation.
  • Promotes flow of blood to the head.
  • Calms the mind, reducing anxiety and fatigue.
  • Helps with menstrual cramps.
How to Practice:
  1. Begin in table position with the tops of your feet on the ground, hip-width apart.
  2. Lower your hips toward your heels, and rest your forehead on the floor.
  3. Extend arms out on the floor in front of you.

Variations:
  • Separate your knees to allow your abdomen to rest comfortably.
  • Allow your hips to "float" above the heels.
  • Adjust your elbows as needed to get your forehead onto the ground or onto your stacked hands or fists.
  • Extend your arms down alongside your body with your palms facing upward.
  • Start in vajrasana. Elongate the spine by pressing down through the sitz bones and up through the crown. Hinge forward at the hips, extending torso over the thighs.​
  • Use blankets under the ankles, behind the knees, under the hips, or under the chest and head for support.
  • For restorative pose, place a bolster vertically between the thighs. You may add block under head of bolster. Rest your chest and head on the length of the bolster with the head turned to one side.
Precautions:
Check with your healthcare provider before beginning any physical practice. 
As always, if a posture causes pain, come out of it immediately. Ask a qualified yoga teacher for assistance.
0 Comments

Kakasana - Crow Pose

10/8/2024

0 Comments

 
Picture
Happy October! In many of this week's ongoing classes, we'll be exploring our Pose of the Month, Kakasana. Kaka translates to crow, but might also remind you of the "caw caw" sound that a crow makes!

Kakasana/Crow Pose is an arm balancing pose that requires strength and focus. It's often seen as an empowering pose, requiring the practitioner to trust their balance and find their center. We'll take a playful approach and try lots of approaches and variations throughout the month and see what happens! 

Benefits of Crow Pose
  • Core Strength: Crow pose engages the core muscles, especially the abs and obliques, to maintain balance.
  • Wrist Strength: The wrists bear significant weight in this pose, helping to build strength and stability in the hands and forearms.
  • Focus and Concentration: Maintaining balance in crow pose demands mental focus and concentration.
  • Shoulder Stability: The shoulders are actively engaged to support the body's weight, improving shoulder stability and strength.
How to Practice Crow Pose
  1. Start in a squat: Begin by squatting down with your feet hip-width apart.
  2. Place hands on the floor: Place your hands flat on the floor, slightly in front of your feet, about shoulder-width apart.
  3. Lift hips: Come onto your tip toes and lift your hips up high.
  4. Lift feet: As you exhale, lift your feet off the ground, bringing your knees towards your armpits.
  5. Shift weight: Shift your weight forward onto your hands, bringing your elbows over the wrists.
  6. Find balance: Once you find your balance, try to straighten your arms slightly, but maintain a strong grip with your hands.
Tips for Beginners:
  • Start with feet on a block: If you're new to crow pose, try practicing with your toes on a block for support. 
  • Add a crash pad: Place a blanket or bolster on the floor under your head to support your head and/or reduce the fear of face planting.
  • Keep your gaze fixed: Looking down at the floor can help you maintain balance.
  • Engage your core: Keep your core muscles engaged to prevent your body from tipping over.
Remember: Don't get discouraged if you don't get it right away. Practice regularly, and you'll gradually improve your balance and strength.
0 Comments

Salabhasana/Locust Pose

7/7/2024

0 Comments

 
Picture
Salabhasana, or Locust Pose, is a yoga posture that resembles, as you might have guessed, a locust. It may improve your posture as it strengthens the back muscles, core, and legs, while also opening up the chest. In Kripalu yoga, you may also hear this pose called boat pose, downward-facing boat, or Navasana.

Sanskrit:
Salabhasana (sha-la-BAHS-ana) Salabha = a locust; asana = pose


Benefits/Purpose:
Locust pose strengthens the back of the body, especially the shoulders, arms, and back. It stretches the chest and abdomen. Like most backbends, it’s a great antidote  to the effects of modern life—reversing the effects of being hunched over the computer/cell phone or slouched on the couch.

How to Practice:
  1. Lie on your belly with your legs extended back, hip width apart and arms alongside the body, palms down. Bring chin or forehead onto the floor to elongate neck.
  2. Press the front of the pelvis into the floor and elongate through your toes and the crown of your head. Stretch your tailbone toward your heels to lengthen the lower back.
  3. Lift your head and chest off the floor, lifting the crown and lengthening the neck, and lift your legs off the floor as you continue to lengthen out through the toes.
  4. Raise your arms off the ground and slightly away from the body. Reach back through your fingertips.
  5. Bring big toes together and hug thighs toward each other.
  6. To release, lower your chest, arms, and legs back to the floor. Rest in Crocodile Pose.
Modifications/Variations:
  • Palms facing up.
  • Lift and lower with your breath, avoiding the hold.
  • Only lift the upper body.
  • Keep hands on the ground.
  • Lift one leg at a time.
  • Half Locust/Boat:  lift one leg and the opposite arm, alternating sides.
  • Hands on the ground under the shoulders, like in Cobra.
  • Extend arms out wide, shoulder level, or forward, like “Superman.”
  • With chin on the floor, bring arms underneath torso with pinkies together, palms down. Push your arms into the ground and lift legs and belly off the floor, eventually bringing legs overhead.
  • Strap around feet, holding with both hands.
  • Blanket under pelvis.
  • Small bolsters or rolled blankets crosswise under upper thighs and rib cage.
Precautions (proceed with care):
Check with your health care provider before beginning any physical practice. If you have high or low blood pressure, or back, neck or abdominal pain, try Sphinx Pose first. If you have weak back muscles, move in and out of the posture with breath to strengthen. Avoid this pose after the first trimester of pregnancy, if you have inguinal hernia, or if you had recent abdominal surgery.

As always, if a posture causes pain, come out of it immediately. Ask a qualified yoga teacher for assistance.
0 Comments

Virabhadrasana 3/Warrior 3 Pose

5/14/2024

0 Comments

 
Picture
Benefits/Purpose:
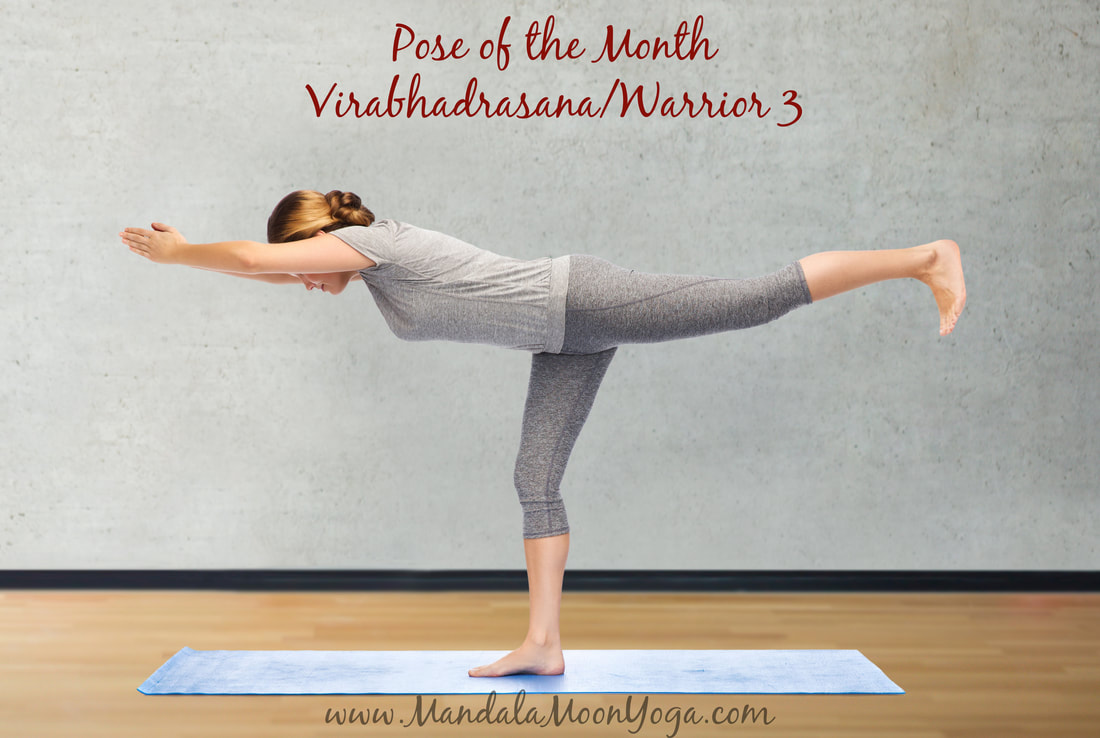
Warrior 3 strengthens the standing leg and ankle in addition to the core. Like all balance poses, it helps us develop concentration and focus. In addition to finding the physical balance, we must also cultivate the more subtle balance between pulling energy in and extending out.

Sanskrit:
(veer-uh-buh-DRAH-sah-nah TREE-nee)
Vira = Hero, Brave;  Bhadra = Blessed, Virtuous, Auspicious; Asana = pose; Triini = 3
AKA Hero, Warrior, Balancing Stick

How to Practice:
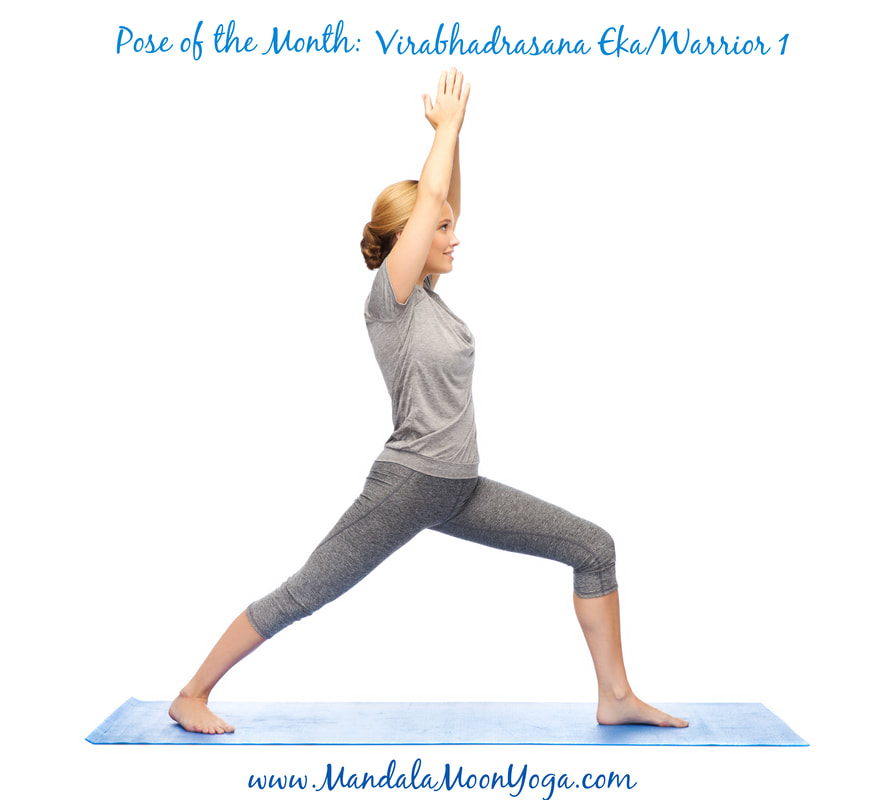
  1. Begin in Tadasana with your hands in Anjali Mura.
  2. Step your right foot about 2 feet forward. Root down firmly with the four corners of each foot.
  3. Shift your weight forward onto your right foot and lift your left heel.
  4. Engage your core and lean your upper body forward, lifting your left foot off the ground. Continue until your body is in a long straight line, parallel to the ground, from your left heel to the crown of your head.
  5. Draw the left knee cap up, and press back through your left heel to lengthen the leg.
  6. Ground the right foot firmly into the ground to activate the standing leg and create space in the right hip joint.
  7. Press back through the left heel as you lengthen forward through the crown of the head, lengthening the entire body.
  8. Use core strength to level the pelvis as much as possible.
  9. Lengthen through both sides of the waist.
  10. Keep the neck long and your gaze directed down toward the ground. Relax your jaw, eyes, and forehead.
  11. Extend both arms overhead in line with the torso and left leg, with the palms facing each other. Reach fingertips forward and draw upper arms into shoulders to traction the arms.
  12. Release the pose, rest, and repeat on the other side.


Modifications/Variations:
  • Hold hands in Anjali Mudra (prayer position) at Heart Center or clasped behind back; arms along sides of body or stretched out wide like airplane wings.
  • For beginners - Follow cues 1-3. Keep the body in alignment with the back toes on the ground and arms extended overhead.
  • Use props. Try placing hands at the wall, on blocks, or on a chair.​
​​

Precautions (proceed with care):
Check with your health care provider before beginning any physical practice. If you have high blood pressure, or back, hip, knee or ankle pain, use modifications. Avoid this pose after the first trimester of pregnancy.

As always, if a posture causes pain, come out of it immediately. Ask a qualified yoga teacher for assistance.

We feature a new pose each month. Check out some of our other asana articles:
​

Tadasana/Mountain Pose
Ardha Chandrasana/Half Moon Pose
Vrksasana/Tree Pose
​Deviasana/Goddess Pose
​
0 Comments

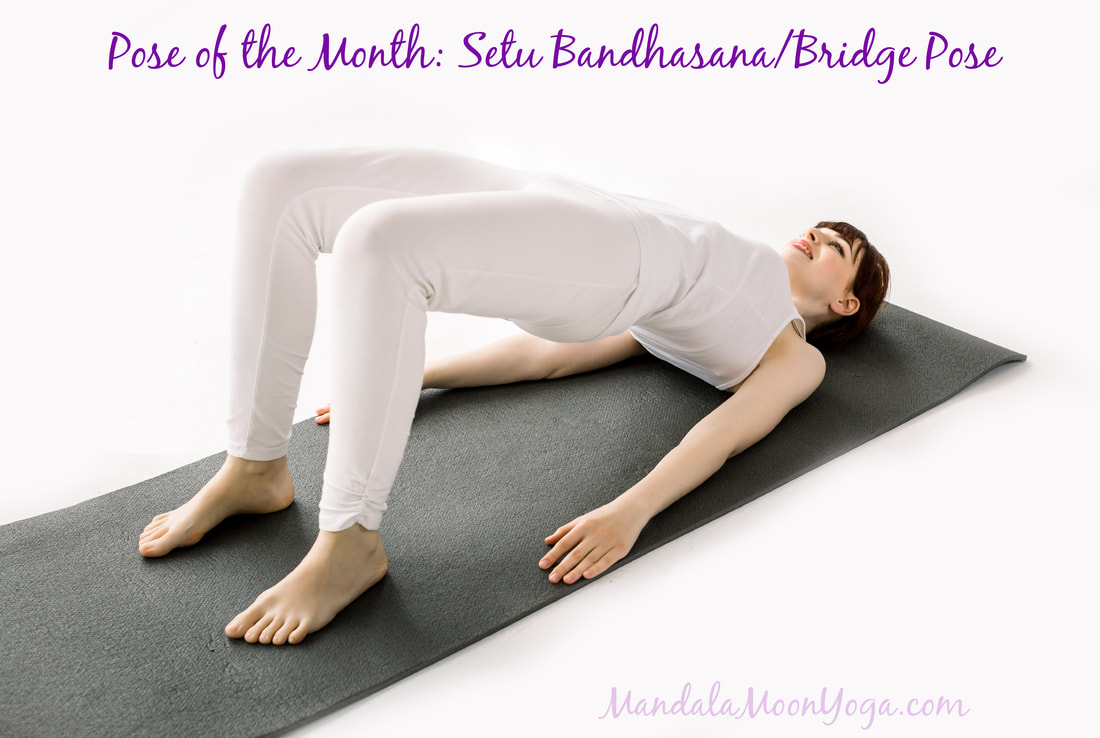
Bridge Pose/Setu Bandhasana

4/8/2024

0 Comments

 
Picture
Setu Bandhasana, or Bridge Pose, is a back bend. It’s also considered somewhat of an inversion, because when we are holding the pose, the heart is above the head. 

Sanskrit:            
setu = bridge or dam; bandha = lock; asana = pose
(SET-too bahn-DAH-sah-nah)
AKA setubhandasana, setu bhandasana, setu bandha sarvangasana

Benefits/Purpose:
This pose strengthens the legs, buttocks, back, and shoulders.  It stretches the legs, hip flexors, abdomen, shoulders, and chest, and it facilitates digestion while supporting the nervous system.

Precautions:
As always, check with your healthcare provider before beginning any physical practice. If you have low back, shoulder, or neck issues or high blood pressure, try moving in and out of the pose with your breath; avoid long holdings. If you are in the third trimester of pregnancy, avoid the pose if it inhibits your breathing.


How to Practice:
  1. Lie on your back with your knees bent, feet flat on the floor, and arms by your sides, palms down. Feet are hip-width apart and close to your sit bones.
  2. Engage abdominals, thighs, and glutes. Press down with your feet to lift your pelvis off the ground. Maintain hip distance between knees.
  3. Relax your neck as your weight shifts toward the shoulders. Interlace your fingers under your back, and lengthen your arms.
  4. Draw your shoulder blades toward each other and press your hands toward your feet. Press arms and shoulders down into the ground, and press sternum up toward the sky.
  5. Breathe deeply into intercostals.
  6. To release, separate your hands and relax your shoulders. Roll the spine down one vertebra at a time.
  7. Extend your legs or hug the knees into the chest. Rest.

Adaptations/Variations:
  • Keep arms alongside body, press arms into ground.
  • Press upper arms into ground, bend elbows and point fingers to sky.
  • Lift and lower hips with breath instead of holding.
  • Pelvis stays low with hip joints flexed.
  • Hold the sacrum with the hands.
  • One leg extended - start with feet resting closer together.
  • Support sacrum with hands (or block) and extend both legs (feet will be on floor)
0 Comments

Matsyasana - Fish Pose

2/4/2024

0 Comments

 
Picture
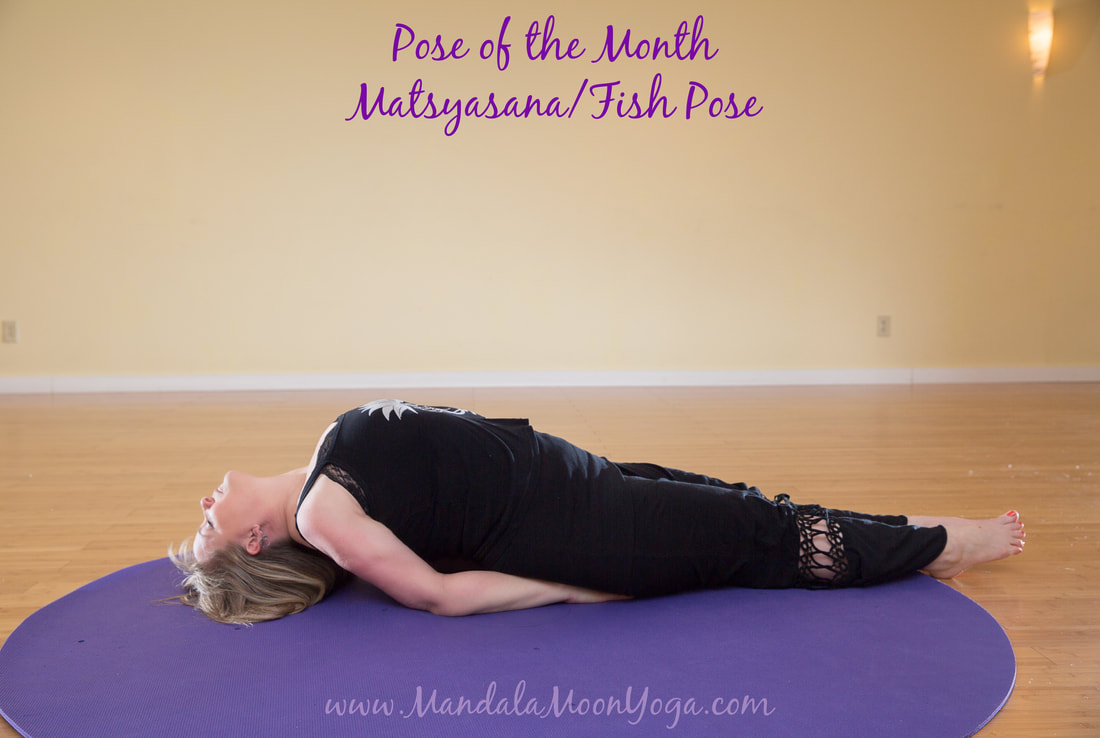
Matsyasana, or Fish Pose, is a supine back bend. It is often confused with Matsyendrasana, the Lord of the Fish Pose, which is a seated spinal twist.

Sanskrit:
Matsya = fish; asana = pose

(mot-see-AH-sah-nah)

Benefits/Purpose:
This pose strengthens the arms, back, and the back of the neck.  It stretches the hip flexors (psoas) and muscles between the ribs (intercostals), stimulates the kidneys and liver, and it releases tension in the neck and shoulders. It opens the chest and improves circulation in the lungs.


Precautions:
As always, check with your healthcare provider before beginning any physical practice. If you have high or low blood pressure, thyroid conditions, migraines, low back, neck or shoulder issues, try the propped restorative version. Be careful to keep weight on your arms to protect your neck.


How to Practice:

  1. Lie on your back with your knees bent and feet on the ground hip distance apart. Rest your arms alongside your body with your palms down.
  2. Lift your hips, and bring your hands under your body, palms down. Press arms into sides of body. Extend your legs out straight and bring them together. (If this strains your back, keep them bent.)
  3. Roll your shoulders back, and press your sacrum, forearms, and elbows into the floor. Draw the shoulder-blade tips in, and lift your chest and head off the ground.
  4. Continue to lengthen your spine from between the shoulder blades to the base of your skull. Keep lifting the chest and lengthening the back body to bring your head back until it just touches the floor. All weight should be on your forearms and elbows, not your skull! Relax your neck and face. 
  5. Keep pressing your forearms down and lifting the chest. Draw the tops of your thighbones down. Press your tailbone toward your heels. Let go of any tension that is not directly involved with maintaining the shape of the asana. Soften your eyes, jaw, and throat. 
Adaptations/Variations:

  • Sit up with legs straight out in front of you and hands on the floor at your sides. Now move your hands back an inch or so and lower the forearms to the ground with upper arms perpendicular to the ground. Roll your shoulders back, and lift your chest. Lengthen the upper part of your spine, and release any tension in your neck or at the base of your skull. Keep the back of your neck long, as an extension of the spine.
  • Restorative: Use a large bolster under your upper body to support spine and head.
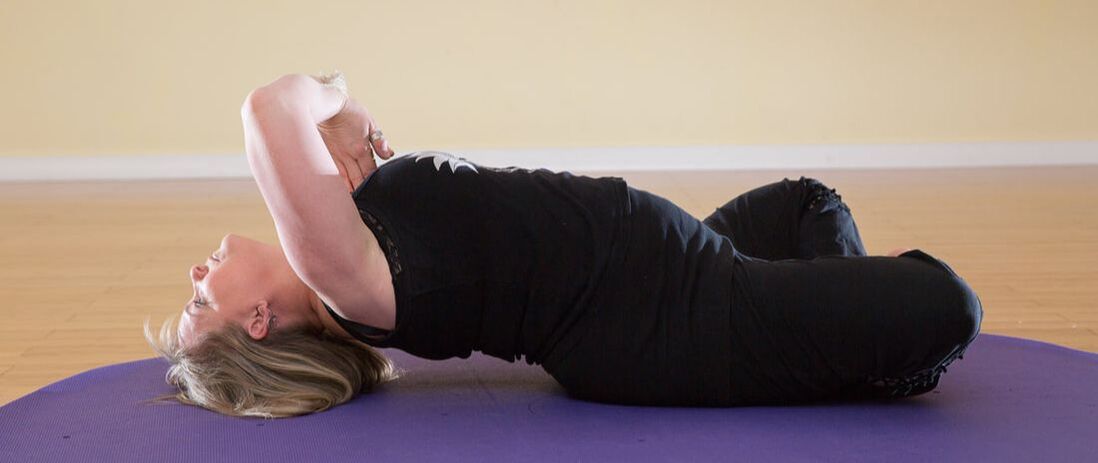
  • Bring legs into Lotus, Half Lotus, or Easy Pose position. (Pictured below with an arm variation as well.)
  • Place a soft prop (blanket, tadpole, pillow) under the head.
  • Bring hand out from under buttocks and reach them toward ceiling with palms together in Anjali Mudra.
Picture
0 Comments
<<Previous

    Dena D. Beratta

    Honored to teach, but always a student.

    Archives

    June 2025
    May 2025
    April 2025
    March 2025
    February 2025
    December 2024
    November 2024
    October 2024
    September 2024
    August 2024
    July 2024
    May 2024
    April 2024
    February 2024
    January 2024
    November 2023
    October 2023
    September 2023
    August 2023
    July 2023
    June 2023
    May 2023
    April 2023
    March 2023
    February 2023
    January 2023
    November 2022
    February 2022
    April 2021
    December 2016
    February 2014
    November 2013
    June 2013

    Categories

    All
    Alignment
    Aparigraha
    Asana (Poses)
    Ayurveda
    Beginner's Mind
    Benefits Of Yoga
    Be Present
    Bhagavad Gita
    Brahmacharya
    Celibacy
    Chakras
    Cookies
    Devotion
    Diwali
    Earth Day
    FAQ
    Gratitude
    Half Moon
    Hanuman
    Kali
    Kapha Season
    Kleshas
    Koshas
    Letting Go
    Lion's Breath/Pose
    Loving Kindness
    Meditation
    Memorial Day
    Metta
    Mindfulness
    Moderation
    Mothers
    Muladhara
    Niyamas
    Pancha Vayu
    Patanjali
    Polite Practice
    Pranayama
    Sankalpa
    Sanskrit
    Self-study
    Showing Up
    Spring
    Spring Equinox
    Stress Relief
    Summer
    Svadhyaya
    Thich Nhat Hanh
    Tips
    Vata Season
    Weight Managmenet
    Winter Solstice
    Yamas
    Yoga Etiquette
    Yoga For Beginners
    Yoga Sutras

    RSS Feed

Call us: (315) 673-7535 or text: (315) 440-9125

Email: [email protected]